Android PHP/MYSQL Tutorial
In this chapter , we are going to explain, how you can integrate PHP and MYSQL with your android application. This is very useful in case you have a webserver, and you want to access its data on your android application.
MYSQL is used as a database at the webserver and PHP is used to fetch data from the database. Our application will communicate with the PHP page with necessary parameters and PHP will contact MYSQL database and will fetch the result and return the results to us.
PHP - MYSQL
CREATING DATABASE
MYSQL database can be created easily using this simple script. The CREATE DATABASE statement creates the database.
<?php
$con=mysqli_connect("example.com","username","password");
$sql="CREATE DATABASE my_db";
if (mysqli_query($con,$sql))
{
   echo "Database my_db created successfully";
}
?>
CREATING TABLES
Once database is created, its time to create some tables in the database. The CREATE TABLEstatement creates the database.
<?php
$con=mysqli_connect("example.com","username","password","my_db");
$sql="CREATE TABLE table1(Username CHAR(30),Password CHAR(30),Role CHAR(30))";
if (mysqli_query($con,$sql))
{
   echo "Table have been created successfully";
}
?>
INSERTING VALUES IN TABLES
When the database and tables are creted. Now its time to insert some data into the tables. The Insert Into statement creates the database.
<?php
$con=mysqli_connect("example.com","username","password","my_db");
$sql="INSERT INTO table1 (FirstName, LastName, Age) VALUES ('admin', 'admin','adminstrator')";
if (mysqli_query($con,$sql))
{
   echo "Values have been inserted successfully";
}
?>
PHP - GET AND POST METHODS
PHP is also used to fetch the record from the mysql database once it is created. In order to fetch record some information must be passed to PHP page regarding what record to be fetched.
The first method to pass information is through GET method in which $_GET command is used. The variables are passed in the url and the record is fetched. Its syntax is given below:
<?php
$con=mysqli_connect("example.com","username","password","database name");
if (mysqli_connect_errno($con))
{
   echo "Failed to connect to MySQL: " . mysqli_connect_error();
}
$username = $_GET['username'];
$password = $_GET['password'];
$result = mysqli_query($con,"SELECT Role FROM table1 where Username='$username' and Password='$password'");
$row = mysqli_fetch_array($result);
$data = $row[0];
if($data){
echo $data;
}
mysqli_close($con);
?>
The second method is to use POST method. The only change in the above script is to replace $_GET with $_POST. In Post method , the variables are not passed through URL.
Android - Connecting MYSQL
CONNECTING VIA GET METHOD
There are two ways to connect to MYSQL via PHP page. The first one is called Get method. We will useHttpGet and HttpClient class to connect. Their syntax is given below:
URL url = new URL(link);
HttpClient client = new DefaultHttpClient();
HttpGet request = new HttpGet();
request.setURI(new URI(link));
After that you need to call execute method of HttpClient class and recieve it in a HttpResponse object. After that you need to open streams to recieve the data.
HttpResponse response = client.execute(request);
BufferedReader in = new BufferedReader
(new InputStreamReader(response.getEntity().getContent()));
CONNECTING VIA POST METHOD
In the Post method , the URLEncoder,URLConnection class will be used. The urlencoder will encode the information of the passing variables. It's syntax is given below:
URL url = new URL(link);
String data  = URLEncoder.encode("username", "UTF-8")
+ "=" + URLEncoder.encode(username, "UTF-8");
data += "&" + URLEncoder.encode("password", "UTF-8")
+ "=" + URLEncoder.encode(password, "UTF-8");
URLConnection conn = url.openConnection();
The last thing you need to do is to write this data to the link. After writing , you need to open stream to recieve the responded data.
OutputStreamWriter wr = new OutputStreamWriter(conn.getOutputStream());
wr.write( data );
BufferedReader reader = new BufferedReader(new
InputStreamReader(conn.getInputStream()));
Example
The below example is a complete example of connecting your android application with MYSQL database via PHP page. It crates a basic application that allows you to login using GET and POST method.
PHP - MYSQL PART
In this example a database with the name of temp has been created at 000webhost.com. In that database , a table has been created with the name of table1. This table has three fields. (Username, Password, Role). The table has only one record which is ("admin","admin","adminstrator").
The php page has been given below which takes parameters by post method.
<?php
$con=mysqli_connect("mysql10.000webhost.com","username","password","db_name");
if (mysqli_connect_errno($con))
{
   echo "Failed to connect to MySQL: " . mysqli_connect_error();
}
$username = $_POST['username'];
$password = $_POST['password'];
$result = mysqli_query($con,"SELECT Role FROM table1 where
Username='$username' and Password='$password'");
$row = mysqli_fetch_array($result);
$data = $row[0];
if($data){
echo $data;
}
mysqli_close($con);
?>
ANDROID PART
To experiment with this example , you need to run this on an actual device on which wifi internet is connected.
| Steps | Description |
|---|---|
| 1 | You will use Eclipse IDE to create an Android application and name it as PHPMYSQL under a package com.example.phpmysql. While creating this project, make sure you Target SDK and Compile With at the latest version of Android SDK to use higher levels of APIs. |
| 2 | Modify src/MainActivity.java file to add Activity code. |
| 3 | Create src/SiginActivity.java file to add PHPMYSQL code. |
| 4 | Modify layout XML file res/layout/activity_main.xml add any GUI component if required. |
| 5 | Modify res/values/string.xml file and add necessary string components. |
| 6 | Modify AndroidManifest.xml to add necessary permissions. |
| 7 | Run the application and choose a running android device and install the application on it and verify the results. |
Here is the content of src/com.example.phpmysql/MainActivity.java.
package com.example.phpmysql;


import android.app.Activity;
import android.os.Bundle;
import android.view.Menu;
import android.view.View;
import android.widget.EditText;
import android.widget.TextView;

public class MainActivity extends Activity {

   private EditText usernameField,passwordField;
   private TextView status,role,method;

   @Override
   protected void onCreate(Bundle savedInstanceState) {
      super.onCreate(savedInstanceState);
      setContentView(R.layout.activity_main);
      usernameField = (EditText)findViewById(R.id.editText1);
      passwordField = (EditText)findViewById(R.id.editText2);
      status = (TextView)findViewById(R.id.textView6);
      role = (TextView)findViewById(R.id.textView7);
      method = (TextView)findViewById(R.id.textView9);
   }
   @Override
   public boolean onCreateOptionsMenu(Menu menu) {
      // Inflate the menu; this adds items to the action bar if it is present.
      getMenuInflater().inflate(R.menu.main, menu);
      return true;
   }
   public void login(View view){
      String username = usernameField.getText().toString();
      String password = passwordField.getText().toString();
      method.setText("Get Method");
      new SigninActivity(this,status,role,0).execute(username,password);

   }
   public void loginPost(View view){
      String username = usernameField.getText().toString();
      String password = passwordField.getText().toString();
      method.setText("Post Method");
      new SigninActivity(this,status,role,1).execute(username,password);

   }

}
Here is the content of src/com.example.phpmysql/SigninActivity.java.
package com.example.phpmysql;

import java.io.BufferedReader;
import java.io.InputStreamReader;
import java.io.OutputStreamWriter;
import java.net.URI;
import java.net.URL;
import java.net.URLConnection;
import java.net.URLEncoder;

import org.apache.http.HttpResponse;
import org.apache.http.client.HttpClient;
import org.apache.http.client.methods.HttpGet;
import org.apache.http.impl.client.DefaultHttpClient;

import android.content.Context;
import android.os.AsyncTask;
import android.widget.TextView;

public class SigninActivity  extends AsyncTask<String,Void,String>{

   private TextView statusField,roleField;
   private Context context;
   private int byGetOrPost = 0;
   //flag 0 means get and 1 means post.(By default it is get.)
   public SigninActivity(Context context,TextView statusField,
   TextView roleField,int flag) {
      this.context = context;
      this.statusField = statusField;
      this.roleField = roleField;
      byGetOrPost = flag;
   }

   protected void onPreExecute(){

   }
   @Override
   protected String doInBackground(String... arg0) {
      if(byGetOrPost == 0){ //means by Get Method
         try{
            String username = (String)arg0[0];
            String password = (String)arg0[1];
            String link = "http://myphpmysqlweb.hostei.com/login.php?username="
            +username+"&password="+password;
            URL url = new URL(link);
            HttpClient client = new DefaultHttpClient();
            HttpGet request = new HttpGet();
            request.setURI(new URI(link));
            HttpResponse response = client.execute(request);
            BufferedReader in = new BufferedReader
           (new InputStreamReader(response.getEntity().getContent()));

           StringBuffer sb = new StringBuffer("");
           String line="";
           while ((line = in.readLine()) != null) {
              sb.append(line);
              break;
            }
            in.close();
            return sb.toString();
      }catch(Exception e){
         return new String("Exception: " + e.getMessage());
      }
      }
      else{
         try{
            String username = (String)arg0[0];
            String password = (String)arg0[1];
            String link="http://myphpmysqlweb.hostei.com/loginpost.php";
            String data  = URLEncoder.encode("username", "UTF-8")
            + "=" + URLEncoder.encode(username, "UTF-8");
            data += "&" + URLEncoder.encode("password", "UTF-8")
            + "=" + URLEncoder.encode(password, "UTF-8");
            URL url = new URL(link);
            URLConnection conn = url.openConnection();
            conn.setDoOutput(true);
            OutputStreamWriter wr = new OutputStreamWriter
            (conn.getOutputStream());
            wr.write( data );
            wr.flush();
            BufferedReader reader = new BufferedReader
            (new InputStreamReader(conn.getInputStream()));
            StringBuilder sb = new StringBuilder();
            String line = null;
            // Read Server Response
            while((line = reader.readLine()) != null)
            {
               sb.append(line);
               break;
            }
            return sb.toString();
         }catch(Exception e){
            return new String("Exception: " + e.getMessage());
         }
      }
   }
   @Override
   protected void onPostExecute(String result){
      this.statusField.setText("Login Successful");
      this.roleField.setText(result);
   }
}
Here is the content of activity_main.xml.
<RelativeLayout xmlns:android="http://schemas.android.com/apk/res/android"
   xmlns:tools="http://schemas.android.com/tools"
   android:layout_width="match_parent"
   android:layout_height="match_parent"
   android:paddingBottom="@dimen/activity_vertical_margin"
   android:paddingLeft="@dimen/activity_horizontal_margin"
   android:paddingRight="@dimen/activity_horizontal_margin"
   android:paddingTop="@dimen/activity_vertical_margin"
   tools:context=".MainActivity" >

   <EditText
      android:id="@+id/editText2"
      android:layout_width="wrap_content"
      android:layout_height="wrap_content"
      android:layout_alignRight="@+id/editText1"
      android:layout_below="@+id/editText1"
      android:layout_marginTop="25dp"
      android:ems="10"
      android:inputType="textPassword" >
   </EditText>

   <EditText
      android:id="@+id/editText1"
      android:layout_width="wrap_content"
      android:layout_height="wrap_content"
      android:layout_alignParentRight="true"
      android:layout_alignParentTop="true"
      android:layout_marginTop="44dp"
      android:ems="10" >

   <requestFocus android:layout_width="wrap_content" />

   </EditText>

   <TextView
      android:id="@+id/textView1"
      android:layout_width="wrap_content"
      android:layout_height="wrap_content"
      android:layout_alignBottom="@+id/editText1"
      android:layout_alignParentLeft="true"
      android:text="@string/Username" />

   <TextView
      android:id="@+id/textView3"
      android:layout_width="wrap_content"
      android:layout_height="wrap_content"
      android:layout_alignParentTop="true"
      android:layout_centerHorizontal="true"
      android:text="@string/App"
      android:textAppearance="?android:attr/textAppearanceLarge" />

   <TextView
      android:id="@+id/textView7"
      android:layout_width="wrap_content"
      android:layout_height="wrap_content"
      android:layout_alignBottom="@+id/textView5"
      android:layout_alignLeft="@+id/textView6"
      android:text="@string/Role"
      android:textAppearance="?android:attr/textAppearanceMedium"
      android:textSize="10sp" />

   <TextView
      android:id="@+id/textView5"
      android:layout_width="wrap_content"
      android:layout_height="wrap_content"
      android:layout_below="@+id/textView6"
      android:layout_marginTop="27dp"
      android:layout_toLeftOf="@+id/editText1"
      android:text="@string/LoginRole" />
   <TextView
      android:id="@+id/textView8"
      android:layout_width="wrap_content"
      android:layout_height="wrap_content"
      android:layout_above="@+id/textView6"
      android:layout_alignLeft="@+id/textView5"
      android:layout_marginBottom="27dp"
      android:text="@string/method" />

   <TextView
      android:id="@+id/textView4"
      android:layout_width="wrap_content"
      android:layout_height="wrap_content"
      android:layout_alignLeft="@+id/textView8"
      android:layout_below="@+id/button1"
      android:layout_marginTop="86dp"
      android:text="@string/LoginStatus" />


   <TextView
      android:id="@+id/textView6"
      android:layout_width="wrap_content"
      android:layout_height="wrap_content"
      android:layout_alignTop="@+id/textView4"
      android:layout_centerHorizontal="true"
      android:text="@string/Status"
      android:textAppearance="?android:attr/textAppearanceMedium"
      android:textSize="10sp" />

   <TextView
      android:id="@+id/textView9"
      android:layout_width="wrap_content"
      android:layout_height="wrap_content"
      android:layout_alignBottom="@+id/textView8"
      android:layout_alignLeft="@+id/textView6"
      android:text="@string/Choose"
      android:textAppearance="?android:attr/textAppearanceMedium"
      android:textSize="10sp" />

   <Button
      android:id="@+id/button2"
      android:layout_width="wrap_content"
      android:layout_height="wrap_content"
      android:layout_centerVertical="true"
      android:layout_toRightOf="@+id/textView6"
      android:onClick="loginPost"
      android:text="@string/LoginPost" />

   <Button
      android:id="@+id/button1"
      android:layout_width="wrap_content"
      android:layout_height="wrap_content"
      android:layout_alignBaseline="@+id/button2"
      android:layout_alignBottom="@+id/button2"
      android:layout_alignLeft="@+id/textView2"
      android:onClick="login"
      android:text="@string/LoginGet" />

   <TextView
      android:id="@+id/textView2"
      android:layout_width="wrap_content"
      android:layout_height="wrap_content"
      android:layout_alignBaseline="@+id/editText2"
      android:layout_alignBottom="@+id/editText2"
      android:layout_alignParentLeft="true"
      android:text="@string/Password" />

</RelativeLayout>
Here is the content of Strings.xml.
<?xml version="1.0" encoding="utf-8"?>
<resources>

   <string name="app_name">PHPMYSQL</string>
   <string name="action_settings">Settings</string>
   <string name="hello_world">Hello world!</string>
   <string name="Username">Username</string>
   <string name="Password">Password</string>
   <string name="LoginGet">Login - Get</string>
   <string name="LoginPost">Login - Post</string>
   <string name="App">Login Application</string>
   <string name="LoginStatus">Login Status</string>
   <string name="LoginRole">Login Role</string>
   <string name="Status">Not login</string>
   <string name="Role">Not assigned</string>
   <string name="method">Login Method</string>
   <string name="Choose">Choose Method</string>

</resources>
Here is the content of AndroidManifest.xml.
<?xml version="1.0" encoding="utf-8"?>
<manifest xmlns:android="http://schemas.android.com/apk/res/android"
   package="com.example.phpmysql"
   android:versionCode="1"
   android:versionName="1.0" >

   <uses-sdk
      android:minSdkVersion="8"
      android:targetSdkVersion="17" />
   <uses-permission android:name="android.permission.INTERNET"/>
   <uses-permission android:name="android.permission.ACCESS_NETWORK_STATE" />
   <application
      android:allowBackup="true"
      android:icon="@drawable/ic_launcher"
      android:label="@string/app_name"
      android:theme="@style/AppTheme" >
      <activity
         android:name="com.example.phpmysql.MainActivity"
         android:label="@string/app_name" >
         <intent-filter>
            <action android:name="android.intent.action.MAIN" />

            <category android:name="android.intent.category.LAUNCHER" />
         </intent-filter>
      </activity>
   </application>
</manifest>
Let's try to run your PHPMYSQL application. I assume you have connected your actual Android Mobile device with your computer. To run the app from Eclipse, open one of your project's activity files and click Run  icon from the toolbar. Before starting your application, Eclipse will display following window to select an option where you want to run your Android application.
 icon from the toolbar. Before starting your application, Eclipse will display following window to select an option where you want to run your Android application.
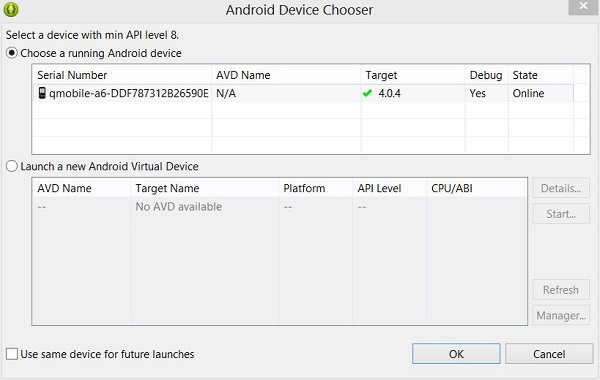
Select your mobile device as an option and then check your mobile device which will display following screen:
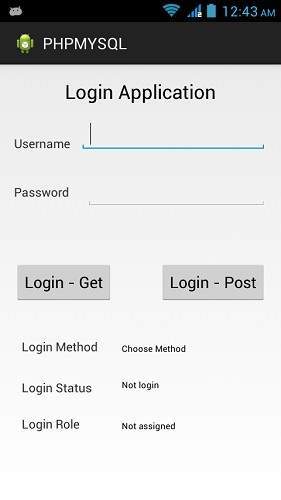
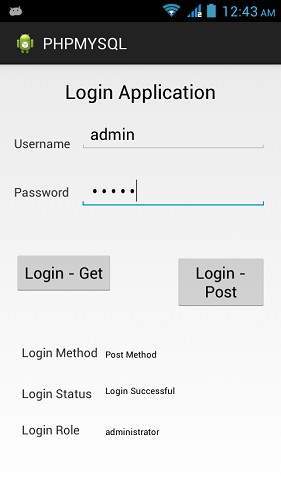
Now just type in your username and password. In my case i am typing admin as username and password. It is shown in the figure:
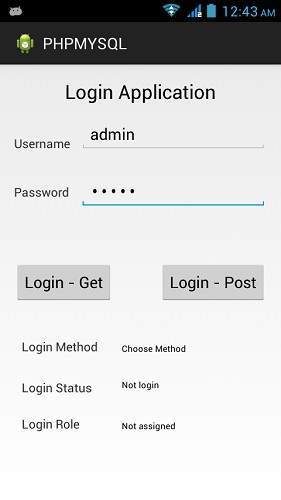
Now press the Get button and wait a few seconds and response will be downloaded and will be shown to you. In this case, the response is the ROLE that is fetched in case of admin as username and password.It is shown in the figure below:
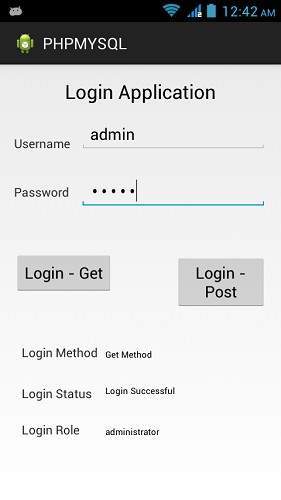
Now again press the POST button and same result woud appear. It is shown in the figure below:

:-)
ReplyDelete